Friday, November 26, 2010

November

Bucks and box beam in place ready for the bales. Basically the bucks provide a space for the window jams and the beam is cranked down on top of the bale wall to provide structural integrity. Our technique of having the beam in situ first is a little unusual (the Australian method as opposed to the Amercian apparently; Craig and i just figured it out ourselves!) as usually the required height of the bucks are estimated first and then packers used to fill a gap if required. This is really a very brief and some what poor description but any strawbale book/site details it so well that i just slacked off here! Sorry!

Pergola poles. The roughest looking landscaping ones turned out fantastic; and finished my shoulder off in the process!. Thus here's ends my involvement presently and Nicky has leapt into my shoes very enthusiastically along with..........


Enter Olly and Rich; the two responsible for the fresh burst of energy on site. I think i mixed concrete and lifted hardwood poles as enthusiastically as them once! But seriously, i've been battling with a shoulder injury for several weeks so have decided that i needed some time out. Nicky's been waiting for an opportunity to become involved; and is so far really enjoying it. She's been busy mixing (and colouring) concrete for the internal wall and (guess what!) staining weaterboards. I, on the other hand, am completly exhausted by the children!

Re-enter the 'folly' into the budget. Looks great but has already taken a heap of time and will take some more yet! Stage one; paper and battens. We are using cavibats (http://www.cavibat.co.nz/) to avoid treated timber ones. WE couldn't afford 'Proclima' paper (http://www.proclima.co.nz/)(although it appears fantastic) so used Tekton instead. There'll be plenty more aout the folly so i'll stop here. Also i'm Dad presently so haven't a clue about what's going on anyway!


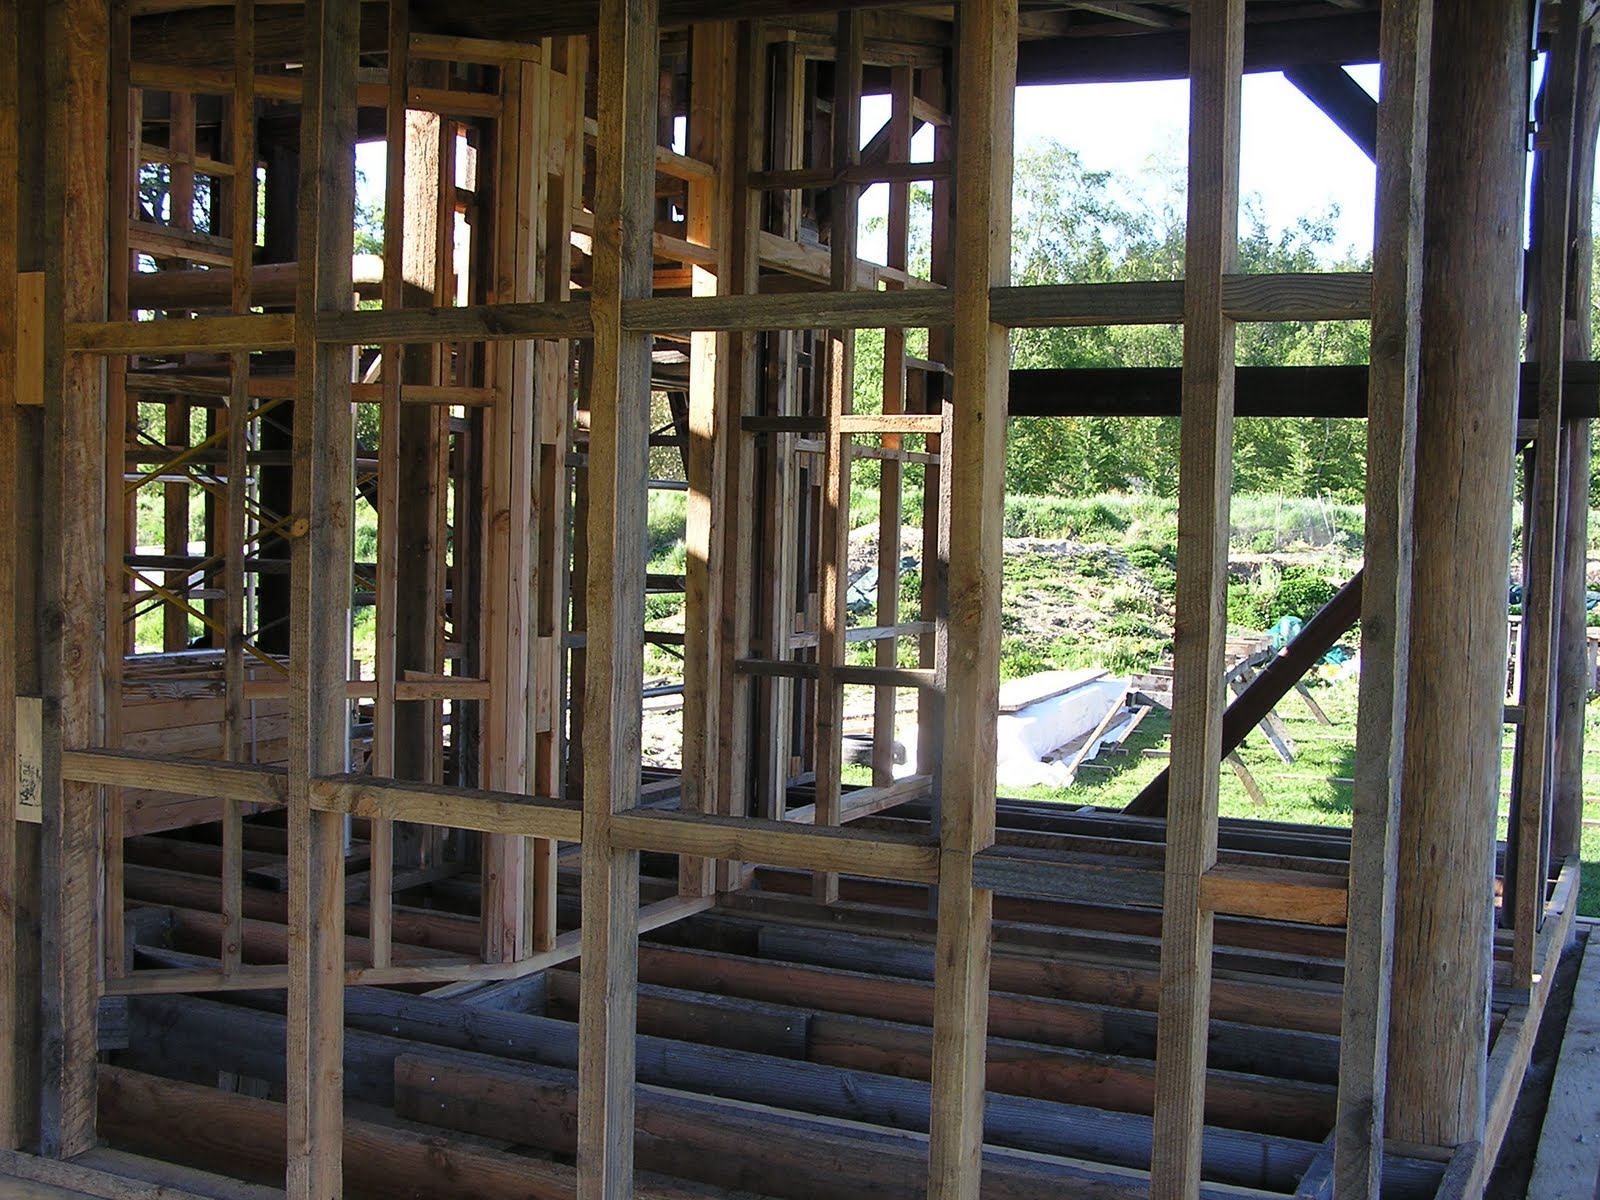
A couple of interesting issues here. Basically we had planned for a masonry or earth wall here for passive solar gain. Then changed the room dimensions and thought we'd save time/money by having a framed wall instead.

However we have always loved the idea of a masonry heater (http://www.amazon.com/Book-Masonry-Stoves-Rediscovering-Warming/dp/1890132098 (inspirational book)). A friend attended a course last year at a friends strawbale house in Alexandra by one of the foremost heater builders in the States (http://mainewoodheat.com/). Unsure as to whether we would require or even afford one we just made up the foundation (bottom left in pic). A corner of framed walls is over it but has be built so that it can be altered around the heater if and when. A bit of futureproofing i guess. So we then realised that we should have more thermal mass afterall in the room. Out comes the sabresaw (first time as yet!), a bit of cutting, boxing, and mixing et viola, a mass wall within a framed wall that will be hidden behind a thin layer of plaster.

Saturday, November 13, 2010

Oct - Nov - Porch & Odds & Sods

q


A few weeks of shorter projects for Craig & me; but still exciting as they all seem to produce significant steps along the path to.............? This image is being, and will continue to be, repeated alot for a while yet. Linseed oiling and staining boards of various kinds


The childrens' area has become a makeshift work for thicknessing the recycled Canadian Douglas fir beams for the mezzanine floor


The front most mezzanine beam inserted with another post; i think it looks great. The bucks to be positioned either side of window/door openings within the SB wall are already made and being stored on the sub-floor.


The 'camp kitchen' set up. Ella ,in particular, loves eating and camping on site.


The porch will be worth every cent and i think vital for an 'outdoors' family. The big window will have a bench under it for propagating seeds etc and the N window provides a lovely sunny spot in the mornings to have a quiet coffee whilst enjoying the view of the sun rising over Grandview Peak.

Sunday, October 17, 2010

Bedroom areas Oct 2010

This area took almost as long as preping the bathroom slab area up; unbelievably. First stage was to insulate the inside of the footing walls with our collected poly scraps. Then the floor level was built up 350mm with compacted scalpings. Thin layer of sand then polythene over everywhere with it being tape sealed aong all joins etc. The posts were treated the same as the main house posts were; 700mm deep in concrete enclosed in a polythene 'sock' having been 'Mulsealed'. After much thought/research i decided not to insulate under this floor (obviously the subfloor will be insulated); a contraversial decision but one i will stand by. Instead i intend to exteriorally 'wing insulate' the southern and western perimeter walls. Check out:- 'http://www.thenaturalhome.com/frostwalls.htm. It seems to make sense, so we shall see

The finished clay floor level will be below the top of the footing wall; the sides of which had been insulated with poly and then DPM'ed. So this 400mm wide sloped section (from the floor to the top of the footing wall, if that makes sense!) was chicken wired and then concreted (to seal that area too), as I felt clay would not hold on the slope.


The floor bearers are from made from the rimu studs out of Paul & Michelle's house. The floor was a quick clay job, chucked down in a couple of hours over the polythene DPM; really just to seal it if the sub-floor area is ever used to store anything.


I am pretty happy with the result as only small cracks and I will seal it sometime with a linseed/beeswax combi. Not an exact recipe; just used what i could get that day and what was lying around the section. 1 trailor load of 'Cardrona' clay (pretty pebbly stuff), 1/3 trailor load of our section clay silt, a couple of sacks of different sands and scraping up scalping leftovers around the place. Leave everything open to a rainstorm over night, mix in trailor, chuck down and run compactor over it a few times.


Details of the subfloor below both sleeping areas of the house. This is the children's area which you can see is partly partitioned (probably will be an earth plaster arch or something) so they can share the room for a few years and then it can be completely separated without too much more work. We have also allowed for 2 doors in the future; one of which will now be used for the entrance to the bigger single room and the other for the time being as a door into a closet within the bedroom. Nicky, Craig and I have discussed a lot about 'future-proofing' and how to design/build now to allow for possible changes in the future. Another future-proofing feature is a slab beneath this subfloor to allow for a small masonry heater to be built (i'll cover in another post).


The west 6x2 wall for the turret between our sleeping area and the children's. This will incorporate a full height warbrobe/cupboard. The engineer precribed sheet bracing for both side walls of the folly; ie plywood or superbrace. The latter appears more inert but, after the recent Christchurch shake, we all thought (perhaps incorrectly!) that ply would be more effective as bracing. After researching heaps about ply offgassing etc, it appears 'Ecoply' offgases less formaldehyde than natural wood even though glues are still used.


Our sleeping area to the left and the children's to the right. The sub floor has no real purpose other than providing a 'sense of occasion' and differentiation between the living and sleeping areas of the house. The beams for the mezzanine floor in our area can be seen.

Sunday, October 03, 2010

sept update 2


So we laid the concrete slab in another long day and then Craig got cracking on the framing for the 3 rooms. The space above the bathroom will be a storage/children's sleeping area if friends come. A changefrom the originalplan of just having it as a roof space; we're trying to squeeze every useable m3 out of the house!


Almost completed framing showing the full height pantry and a funky 'bobble' glass window we got given as a bit of a feature. I'm beginning to love the pastel colours of the 1960's lead paints!


The timetable was progressing well until Greg heard of a farm cottage available for salvaging with only a week left. WE arrived and teh tin roof had gone but we took the roof rafters down in a day and had 'em stacked away; just what we needed for the extra timber Greg required for the window frames.


Next day we stripped 3 rooms of the wall sarkign boards. It appeared the whole house was Southern Beech; a rare find indeed! We were optimistic about the floor T&G too but we we'd cut out and lifted a section the boards were riddled with borer holes so no luck there. We'll go have a final nose around after the digger has pulled the walls over so we might grab a few straight stubs and even a few weatherboards. It took Greg a day and a half to process the rafter 4x2's and both of us day to clean up the sarking. Time consuming but worth it. That'll look great on one of our ceilings!

Friday, October 01, 2010

sept update 1

Having spent 3 weeks making the boxing for the big perimeter footing pour, it takes almost that time to prep and hand pour the bathroom, toilet, pantry and porch area slab. Only slab in the house but went for concrete due to these being 'wet and functional' areas. The inside of the perimeter wall is insulated with landfill saved insulated panel foam segments; very painstaking to place in a jigsaw fashion!

The porch footings are also insulated as are the house footings inside the porch. Plumbing done (Aquatherm pipes, Greenpeace approved apparently). Then these areas are filled with 'scalpings', compacted, more reclaimed poly sheets on floor, polythene, then heating tubing and reinforcing ready for the pour


Close up of the bathroom, toilet, pantry plus the mini slabs for wood stove and washing machine with the future earth floor hallway inbetween. Yes we went for underfloor heating tubes! I ummed and ahhed for weeks over this but relatively cheap to buy and install so if we don't want to have them plumbed in right away at least there for the future. Our restored wood stove will produce heaps of hot water so if this area does end up cold then that can be put to good use heating the floor.


The funky looking footing for the masonry wall made with corrigated iron boxing (unfortunately buried of course) and same idea as above for insulating the footings beneath the sleeping areas timber sub floor


An earlier photo showing the work involved with preping for the piles to be concreted in and how much we had to build up the level of the of the ground. I lost count of the number of our trailor loads; approaching 10 i think. The weather reduced (as it still has) the entrance to our land into a mudbath so big trucks and mini tractor loading the base would have caused mayhem. Our trusty 4X4, trailor and shovel completed the job with least damage to the land. Plus the children loved seeing their old man driving an enormous loader at the local quarry to scoop the gravel up in!

Monday, August 16, 2010

August Update

Well things have moved on heaps since our last posting. We now have a roof; the 'folly' is framed out and looking out over the section. Most recently the boxing for the concrete stem wall was completed and the concrete lorries arrived!


A few pics to show how our house is now shaping up:


Boxing for concrete (1), showing cages internally (2);


some complicated bits to satisfy earthquake risk...(3); internal footings around kitchen/bathroom (4)


External view showing the roof, folly and the completed boxing. Note the beautiful blue sky


......and then the rain came so we had to dig makeshift drainage to take water out of footings. Fun to do on a Sunday afternoon? NO!! Good job JB is pretty good with a shovel (he's been offered a job as a gravedigger in the past!!) Our beautiful children spent wellover an hour 'punting' around a shallow pond which had formed - on a piece of insulation foam!! Think we got through even more than the usual 3 changes of clothing per child that day


And it was all for this:


Lewis and Ella were very excited to see the concrete being poured - a pretty momentous day for us all.


Action stations - all hands on deck!


A well deserved break.
Ella had been helping to float the concrete. She likes to be an important part of the team


They didn't send as much as we requested so last thing on a Friday they had to send another truckfor 1 cubic metre of concrete - tested the old ethics a bit that... The guys decided to dig post holes to make use of any extra -good job they did. Greg and JB finished at 7 getting the last concrete in the ground.


Job done!!

Tuesday, May 25, 2010

'Back to the future - the new pioneers' By Sue Wards

A talented local journalist wrote the following article on the house for the local rag. I've cut 'n paste'd it in so excuse the lack of presentation. I wasn't interested in talking about our house per se; it was really so that if other local people wished to pursue their own individual house design 'outside-the-square' then to illustrate how we have managed to acheive that. Greg came along and spoke alot too so Sue is kindly writing up the whole interview which will be presented here soon.


'Ghandi’s exhortation to “be the change you want to see in the world” was one inspiration for James and Nicky Briscall to embark on a building project very different from most.
It is likely many people would have compromised or given up after encountering some of the obstacles James and Nicky have met, but the couple remain committed to building their dream home and using their experience to help people with similar goals. “The house has almost become an instrument for change. We’re almost pioneering,” James said. “If you want a naturally built, untreated house and put it through the building code, it can be done.”
The Briscalls, originally from the UK, bought their Hawea Flat section four years ago. After dreaming for years of building a warm, healthy, organic home, the process had begun. “I think a house is more than a physical entity. It was symbolic of our life,” Nicky said. The couple wanted to use untreated, natural building materials, either recycled or locally sourced.
Their builder, Greg Tump, introduced them to architectural draughtsman Richard Vostermann, who worked with the couple for more than a year to incorporate the features they wanted while ensuring compliance with the Building Code.
“Certain aspects of this house pushed them [the QLDC] more,” Greg said. The house will be straw bale, wrapped around a timber post and beam structure, with both clay and recycled timber walls and floors. There will be no treated timber in the house and an ancient plaster system of lime over cob will be used, requiring regular lime washing.
People wanting to build something different must present evidence as part of the alternative solution clause in the Building Code. “It’s a minefield of a clause, the interpretation is so wide open,” Greg said. “It is a bugbear for people who really want to do something different.” While Central Otago’s environment is “perfect for straw bale”, Greg said, the QLDC wasn’t convinced and the Briscalls spent many hours and thousands of dollars to justify their ideas.
The outcome has been the granting of a consent for 15 years. “We’re considering it lasting for hundreds of years, not tens of years,” James said. “That’s where our faith in our design and our builder comes in,” Nicky said. They describe their design as “a house from the past for the future, combining age-old, proven techniques with modern technology.”
A team approach to the build has been important both for the couple and their builder. “Building a house like James’ and Nicky’s is a breath of fresh air,” Greg said. He enjoys the collaborative approach between owner and builder and the commitment to sustainable building.
The project has taken longer and cost more than they thought, but the Briscalls are content. “For us, to take a year or two out of our lives to create a home with natural materials, which have been used for hundreds of years, and the fact we will contribute very little to landfill,” James said, “I can sleep at night.”
“We’ve had a lot of people who’ve given a lot of time and thought to this process without charging us,” Nicky said. “We’d love to see other people use what we’ve done.” For that reason, the couple are blogging what they’ve learnt at http://strawhousenz.blogspot.com/.

Sunday, May 23, 2010

mistakes and all

Having published and publicised the blog, i've now re-read it and seen heaps of both spelling and grammatical misktakes. Apologies!

Wednesday, May 12, 2010

Photos 2010 pt2

The rafter system partly constructed. The double rafter runs were fixed onto the beam system first (with extensive use of string lines to find any sort of level!), then the 'outrigger' areas (as in the photo) and then the central area surrounding the 'turret' were nailed on. 250mm rafters with 50mm spacers on them to allow for 300mm of insulation (hopefully the same insulation value as the strawbale walls).


The completed 'eagle' wing rafter system. Lovely to look at but all will be hidden from view in th e roof space


Rafters, 'spacers' running along them and then purlins crossing them for the tin roof to be screwed onto. Also the surrounding 'flying' rafter to help stabilise the overhanging rafter ends. Also included, though not clear in the photo, is the system of blocks between the rafters to help stabilise them too. A lot of wood for a strawbale house!


Tomek at the thicknesser exposing the amazingly grain in the Southern Beech mezzanine floor boards and the rimu ceiling.


Chari partiently stripping paint off the old weatherboards i took off the house (prior to Tomek passing them through the thicknesser)


Till sanding the splinters of teh rough sawn Oregon 10x2's, 6x2's and 4x2's. Basically all the roof and wall framing timber for the whole house!

Tuesday, May 11, 2010

photos 2010


Tomek and I had a 12 day boring/digging 1200mm holes. Then another long day painting the bottom 1500mm with some bitumen based gunk. Then we missed all the fun (and any photos) of them being 'planted'. Not to miss out on any more fun we did get to shovel concrete into the holes though! Our very own wood henge!


The beam system having been made almost a year ago on the ground is painstakingly placed piece by piece on the posts. This involved scribing the shape of the beam onto the post and then cutting out the exact scalloped shape.........yep it took C&G a while (understandably)!


Craig and Greg made some 'Dr Seus' style scaffold to save on hire costs whilst Ella lounged around


The poles are drawknifed from their initial rough condition to expose their true colour and grain. On average 1 pole/day and so far 50 poles (and probably still more!). These are for the cross bracing so they have been chainsawed into more of a sleeper profile.


Linseed & Vege turps brings out the shine and the only conditioning they will receive. Phew an easy quick job at last.......er until we started paimting the whole beam system with it